Venue Setup & Digitization
This comprehensive guide explains how to digitalize an indoor venue from scratch. The digitalization process transforms your physical space into a digital representation that can be used with the Woosmap Indoor API.
Overview
Woosmap Indoor consists of APIs and tools to configure and view maps for indoor environments. These maps are digital representations of cartographical drawings with familiar features like tilt, rotate, zoom, and 2D extrusion.
The elements on the maps (Points of Interest or POIs) are defined during digitization and are searchable. The maps also contain defined pathways that act as a navigation network, providing user-friendly walkways and inter-floor connections.
Let the Woosmap team manage your complete digitization workflow — transforming raw floor plans into production-ready GeoJSON files with POIs, routing graphs, and profiles included. Get in touch to begin
Recommended Software
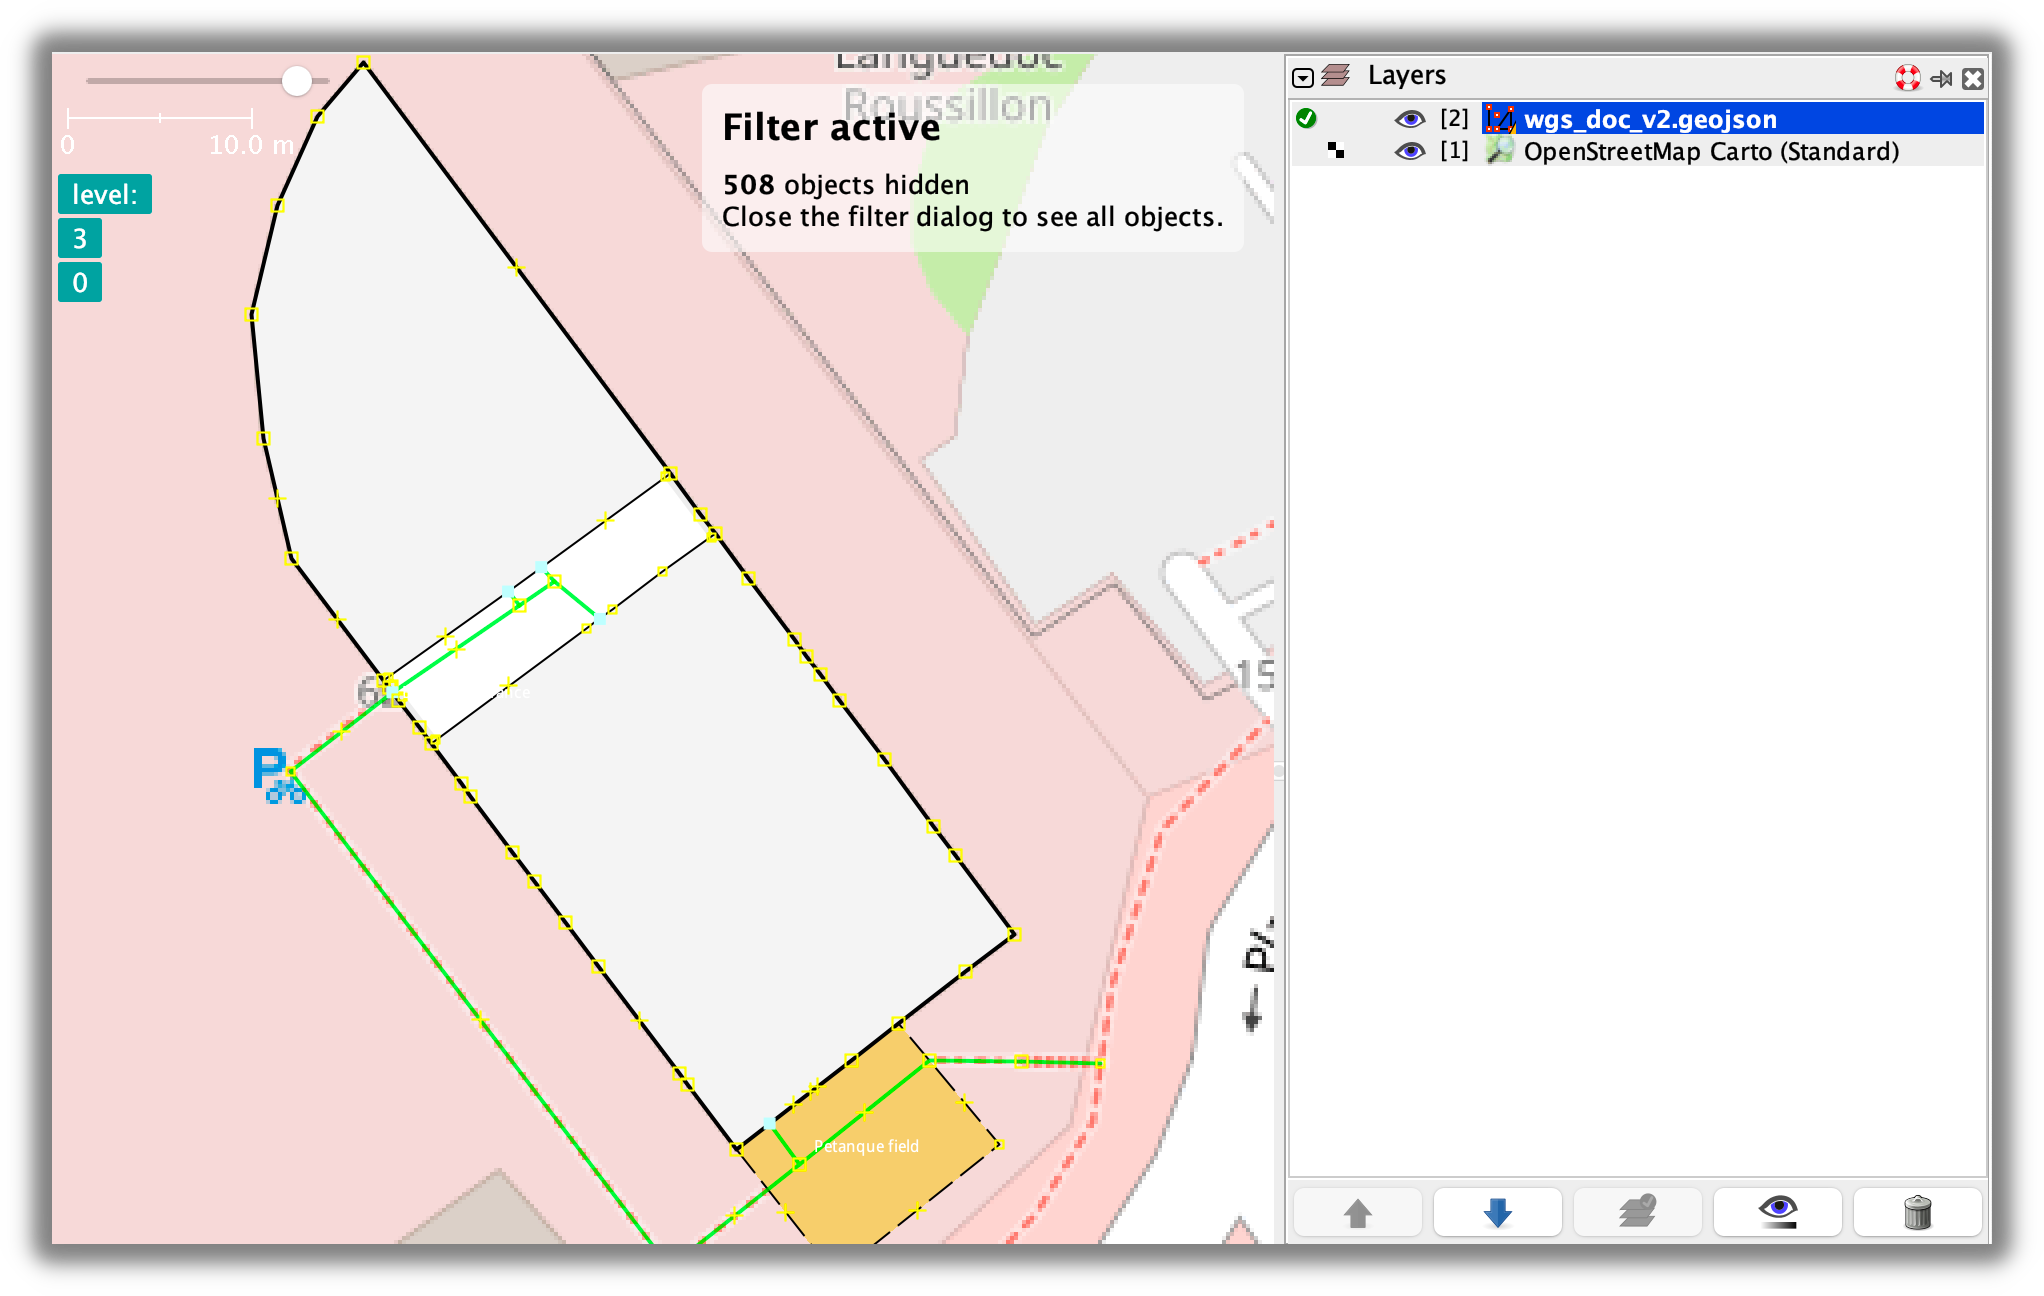
To create your indoor venue, you’ll need to upload a GeoJSON file to the Woosmap platform. We recommend using JOSM (Java OpenStreetMap editor) for creating this file.
JOSM is a free, open-source desktop editing tool that provides:
- GPX file importing (GPS tracks)
- Aerial imagery support
- Multiple cartographic projections
- Layer management
- Data validation tools
- Preset configurations and rendering styles
- Extensive plugin ecosystem
Download JOSM: https://josm.openstreetmap.de/
![]()
Setting Up Your Workspace
Since your indoor map will be displayed on the Woosmap Map, use OpenStreetMap data for georeferencing your features:
- Open JOSM
- Navigate to Imagery menu
- Select “OpenStreetMap Carto”
- The OSM map will appear as your background layer for accurate georeferencing
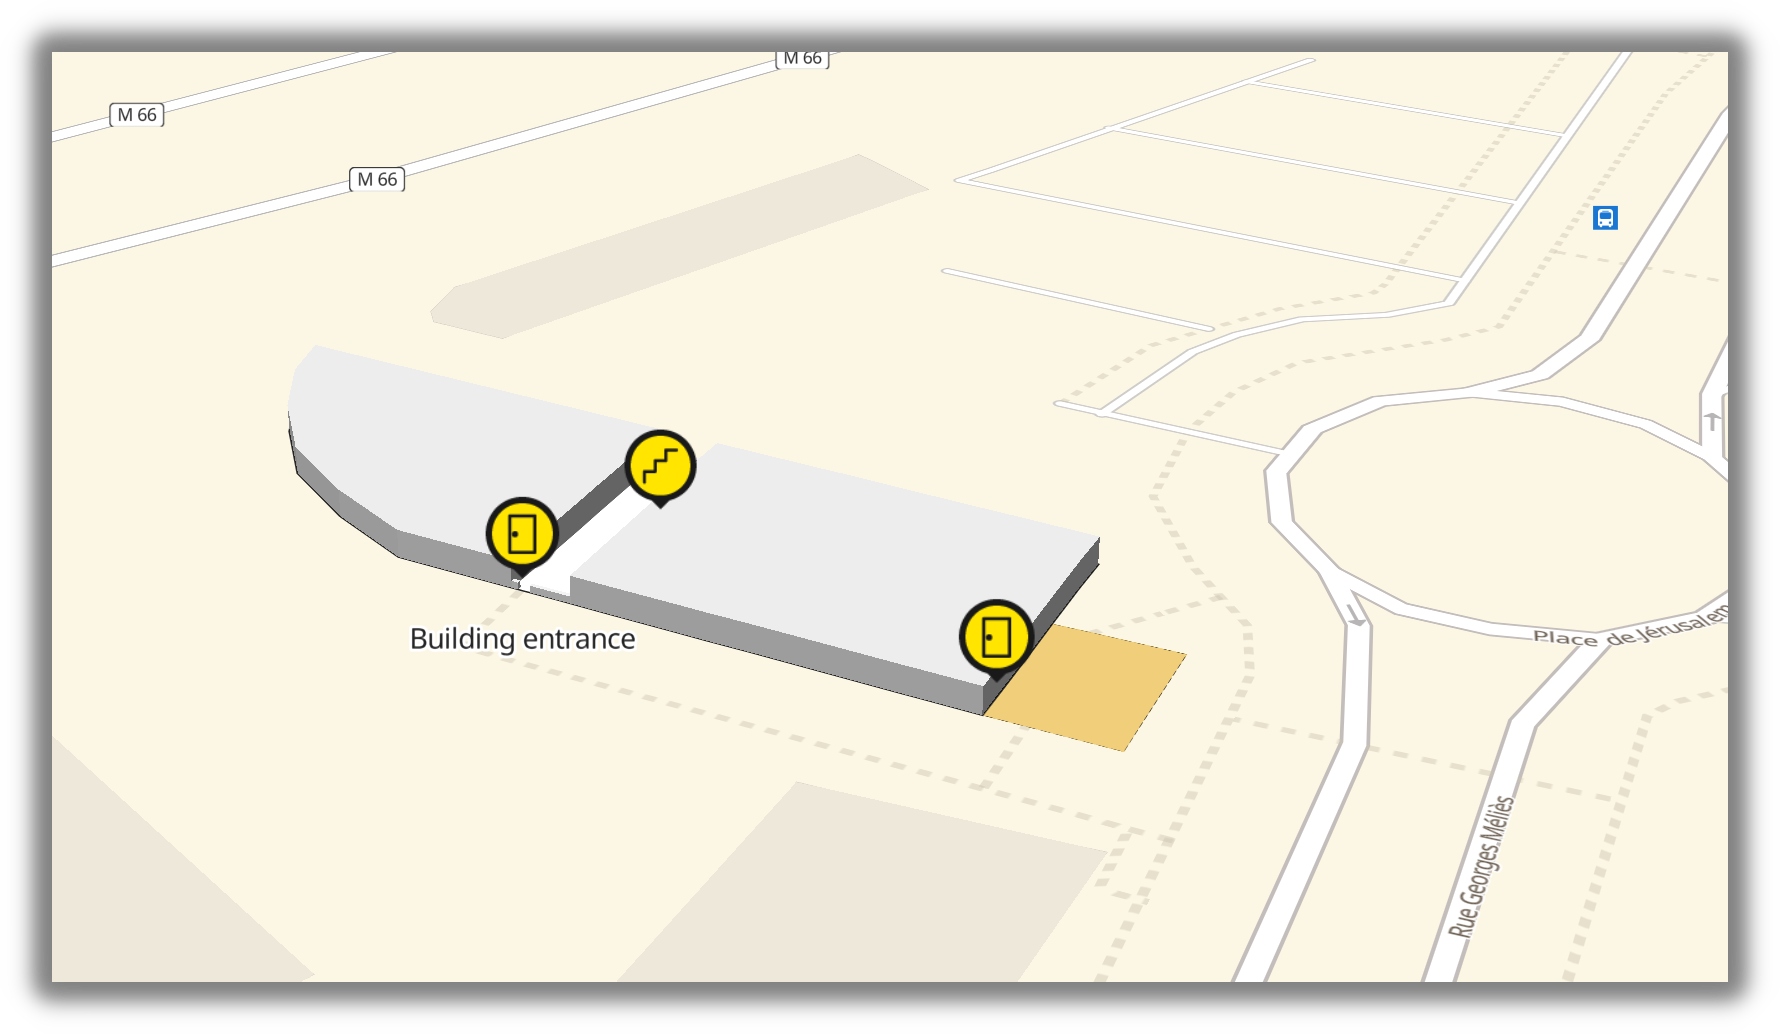
An indoor map rendered on top of the Woosmap Map.
In JOSM, you can easily add the OpenStreetMap Map as a background. Open Imagery menu and select “OpenStreetMap Carto”:
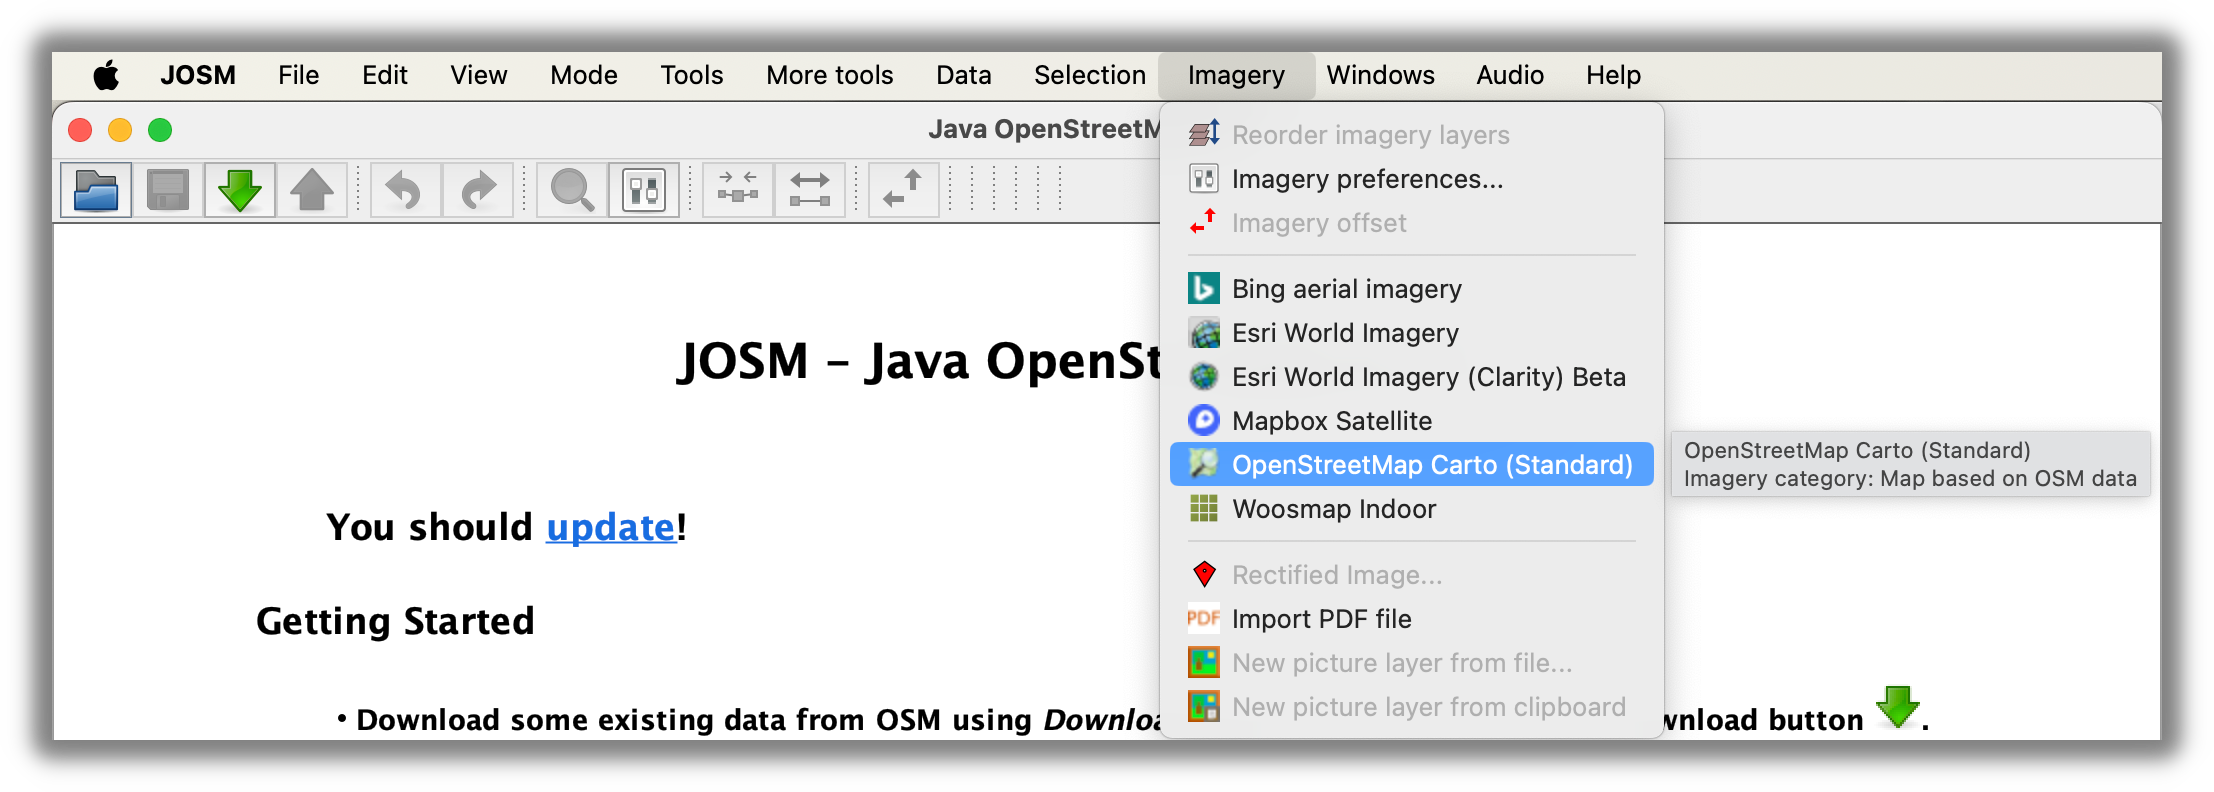
Then, you will see OpenStreetMap Map as a background:
GeoJSON Format Requirements
GeoJSON is an open standard format for representing geographical features based on JSON. Your indoor venue file will consist of multiple features.
Example Feature Structure:
        {
  "type": "Feature",
  "properties": {
    "indoor": "yes",
    "level": "0",
    "amenity": "toilets",
    "name": "Building entrance",
    "name:fr": "Entrée du batiment"
  },
  "geometry": {
    "type": "Point",
    "coordinates": [3.92162187466, 43.60666618464]
  }
}
All features consist of:
- Geometry: Array of lat/lng coordinates defining the shape
- Properties: Metadata describing the feature
Venue Structure
Indoor venues in Woosmap are organized hierarchically:
        Venue
  ├── Buildings (multiple buildings per venue)
  │   ├── Levels (floors)
  │   │   ├── POIs (points of interest)
  │   │   └── Paths (navigation network)
  └── Metadata (categories, styles, settings)
Mandatory Properties
To be processed by Woosmap, these properties are required:
indoor(required): Defines the feature type (see types below)level(required): Integer representing the floor level- Use semicolon-separated integers for multi-level features (e.g., “0;3” for stairs)
ref(optional but recommended): Unique identifier for the feature- Must be unique across the entire venue
- Used as a functional identifier (e.g., “ref:bakery001”)
Feature Types Using indoor Property
The indoor property determines how the feature is styled and rendered:
Floor Level Boundaries - indoor = "level"
- Create polygons to define the boundaries of each floor level
- Establishes the outer perimeter of the level
Rooms with Walls - indoor = "room"
- Create enclosed spaces with walls
- Used for shops, offices, conference rooms, etc.
- Acts as an obstacle in routing
Areas without Walls - indoor = "area"
- Create open spaces like halls, atriums, or zones
- Not considered obstacles in navigation
- Can be crossed by routing algorithms
Other Features - indoor = "yes"
- All other features including POIs and routing graph elements
- General-purpose classification
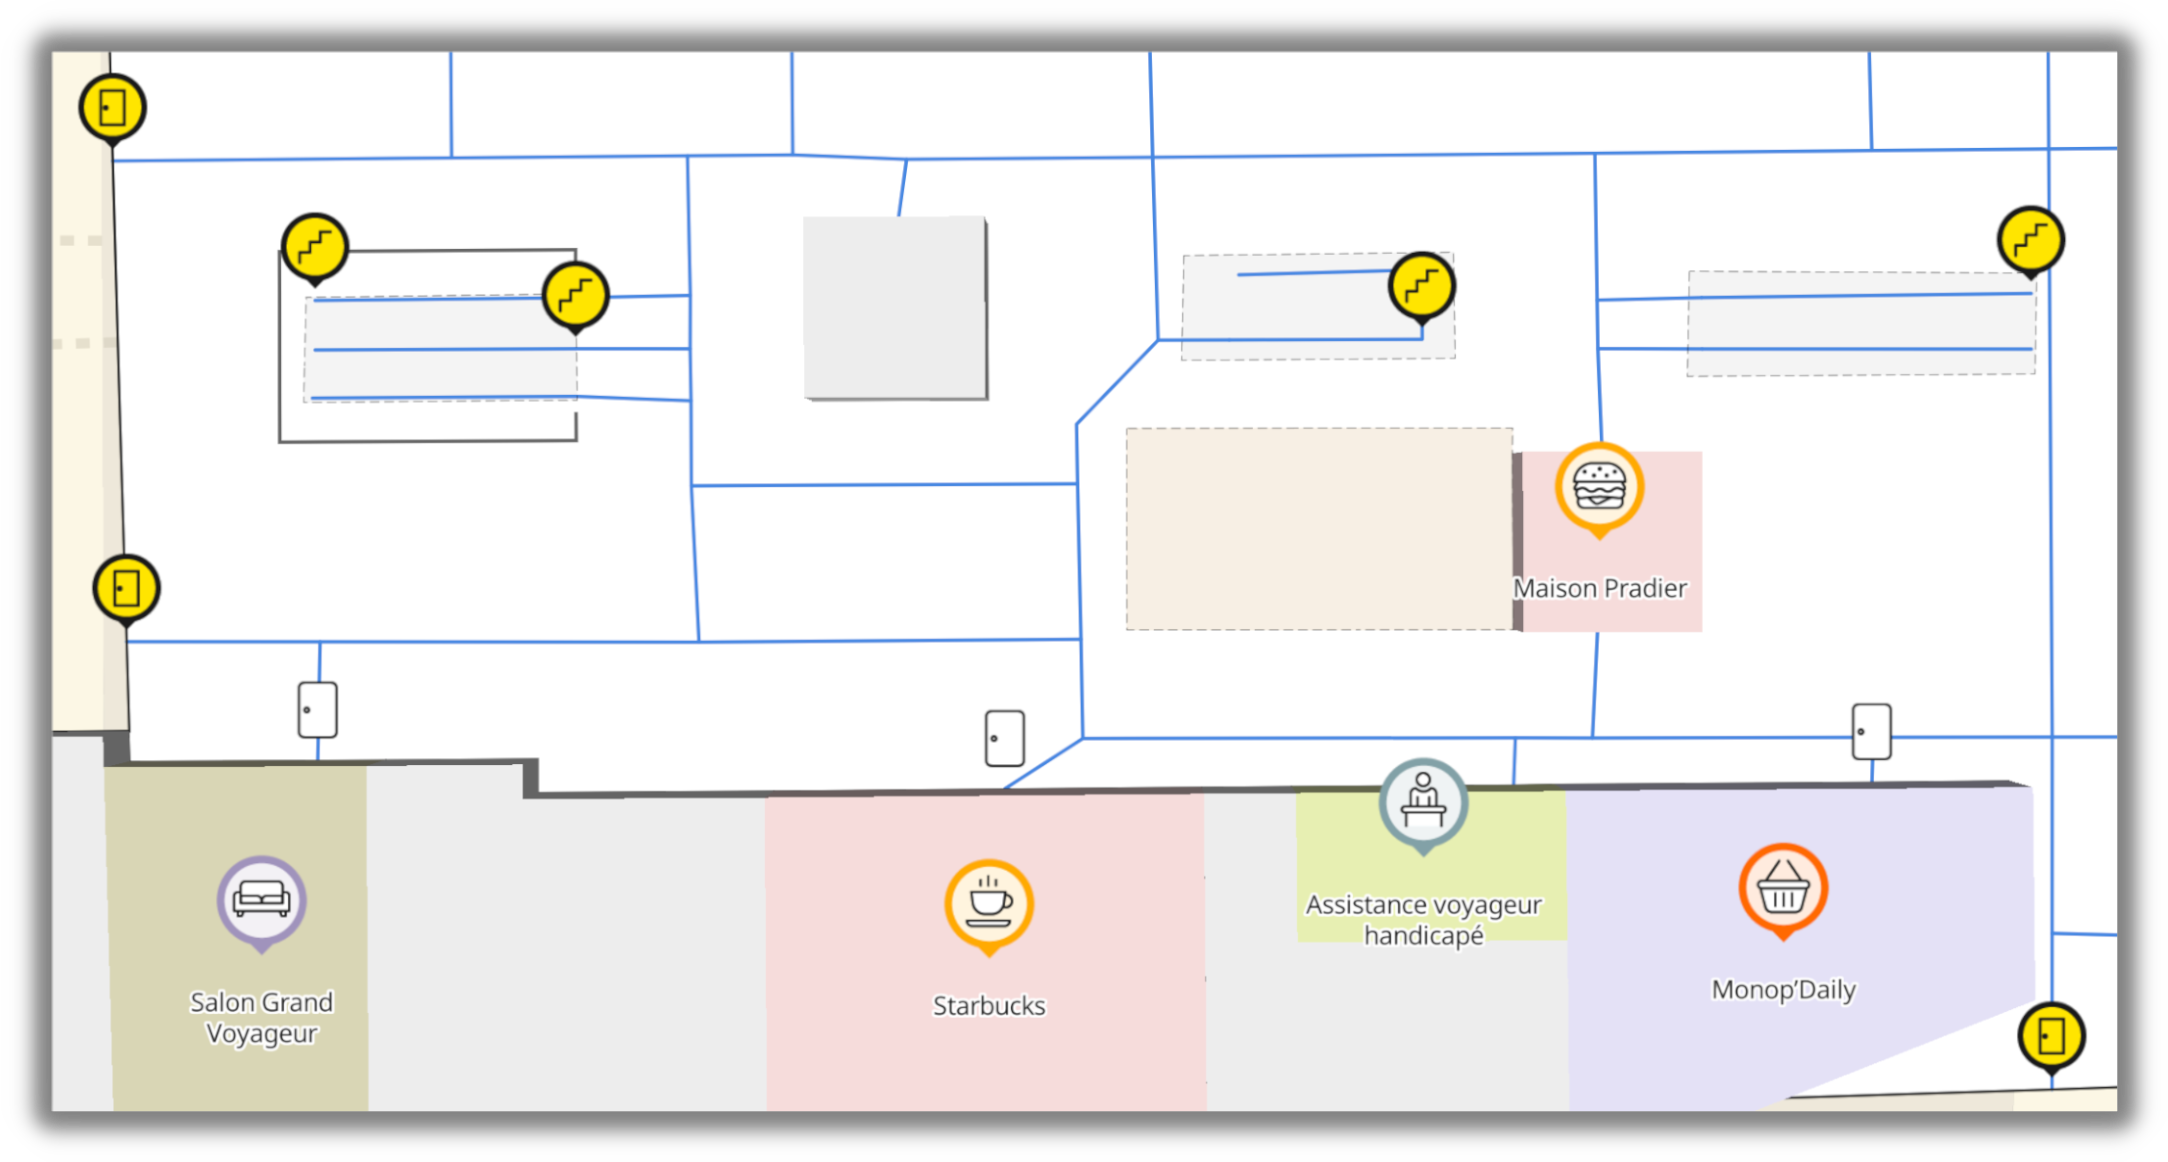
Creating Points of Interest (POIs)
A feature with a name property is automatically categorized as a POI, making it searchable through the Indoor Search
API.
Basic POI Example:
        {
  "type": "Feature",
  "properties": {
    "indoor": "yes",
    "level": "1",
    "name": "Artisan Bakery",
    "shop": "bakery"
  },
  "geometry": {
    "type": "Point",
    "coordinates": [3.92162187466, 43.60666618464]
  }
}
Applying Types to POIs
Assign a type to your POI to give it a visual identity with icons and colors. Types are based on OpenStreetMap tagging conventions:
Main Type Families:
amenity=*: Useful facilities for visitorsshop=*: Commercial establishmentsroom=*: Rooms inside buildings
Amenity Types (selected examples):
amenity=toilets- Restroomsamenity=restaurant- Dining establishmentsamenity=cafe- Coffee shopsamenity=parking- Parking areasamenity=atm- ATM machinesamenity=reception_desk- Reception areasamenity=smoking_area- Designated smoking zonesamenity=drinking_water- Water fountainsamenity=pharmacy- Pharmacy/drugstoreamenity=place_of_worship- Religious spacesamenity=food_court- Food courtsamenity=lounge- Waiting lounges
Shop Types (selected examples):
shop=bakery- Bakeriesshop=clothes- Clothing storesshop=electronics- Electronics retailersshop=jewelry- Jewelry storesshop=supermarket- Supermarketsshop=beauty- Beauty salonsshop=mobile- Mobile phone shopsshop=gift- Gift shopsshop=duty_free- Duty-free shopsshop=travel_agency- Travel agencies
Room Types (selected examples):
room=office- Office spacesroom=meeting- Meeting roomsroom=class- Classroomsroom=storage- Storage roomsroom=kitchen- Kitchen areasroom=server- Server roomsroom=laboratory- Labs
For complete lists with icons, refer to the digitalization guide.
Creating the Routing Graph
The routing graph defines walkable pathways for navigation. Create this after adding all POIs.
Pathways
Pathways connect POIs and define the navigation network.
The Woosmap Console doesn’t allow you to create/edit the routing graph; you must manage it on JOSM.
Requirements
- Pathways should touch each POI
- For irregular POI shapes, extend pathways inside the POI
- Prefer simple networks over complicated meshes
- Avoid creating closed loops
- Each node should be used only once per pathway
Pathway Properties
        {
  "type": "Feature",
  "properties": {
    "highway": "footway",
    "level": "0",
    "indoor": "yes",
    "oneway": "yes" // Optional: for one-way paths
  },
  "geometry": {
    "type": "LineString",
    "coordinates": [
      [3.9218735, 43.6063247],
      [3.9218079, 43.6063868],
      [3.92155344244, 43.60662792236]
    ]
  }
}
One-way Paths:
- Add
oneway=yesproperty - Direction is determined by the order of coordinates in the geometry array
Floor Level Connectors
Connect multiple floor levels with specialized features.
Connector Types:
 Elevator - Add
 highway=elevatorproperty. Stairs - Add
 highway=stepsproperty. Escalator - Add
 highway=stepsandconveying=forwardproperties.- Ramps: Accessible inclines
Multi-level Property: Use semicolon-separated level values:
        {
  "type": "Feature",
  "properties": {
    "level": "0;3",
    "highway": "elevator",
    "indoor": "yes"
  },
  "geometry": {
    "type": "Point",
    "coordinates": [3.92176099159, 43.60670179445]
  }
}
Routing Profiles
Control access to specific paths based on user types or accessibility requirements.
Profile Property:
        "properties": {
  "level": "0",
  "highway": "footway",
  "indoor": "yes",
  "woosmap:routingprofile": "valid"
}
Common Profiles:
valid: Standard accessible paths (suitable for everyone, including wheelchair users)wheelchair: Wheelchair-accessible routes only (no stairs)staff: Staff-only access routespremium: VIP or premium customer routessecurity: Security personnel routesemergency: Fastest evacuation routes
Multiple Profiles: Separate multiple profiles with semicolons: "woosmap:routingprofile": "valid;staff"
Best Practices:
- Mark stairs and escalators appropriately for wheelchair routing
- Use
validprofile for general accessible routes - Use
wheelchairprofile to restrict routes for mobility-impaired users - Create separate routing profiles for different user categories
Uploading Your GeoJSON
Once your GeoJSON file is ready, follow these steps in the Woosmap Console:
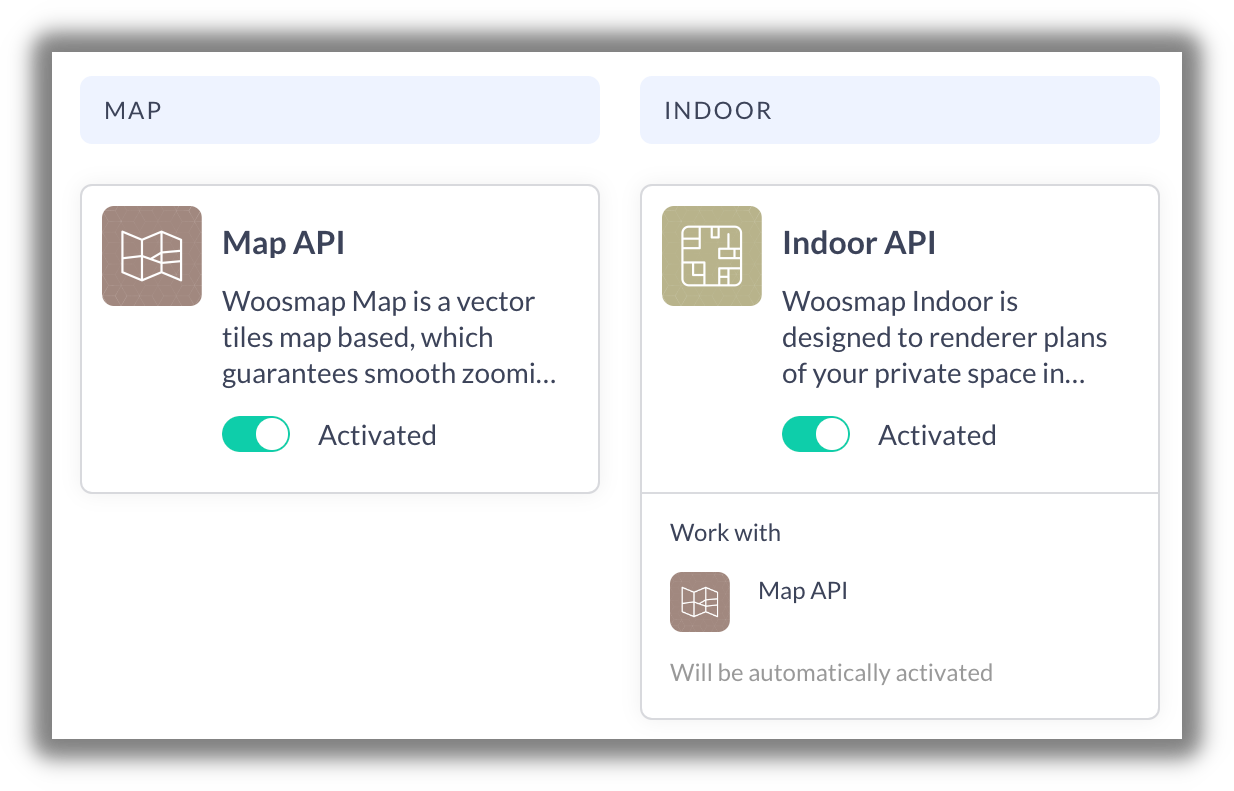
Step 1: Enable Required Products
- Navigate to the Products tab
- Enable Map API
- Enable Indoor API
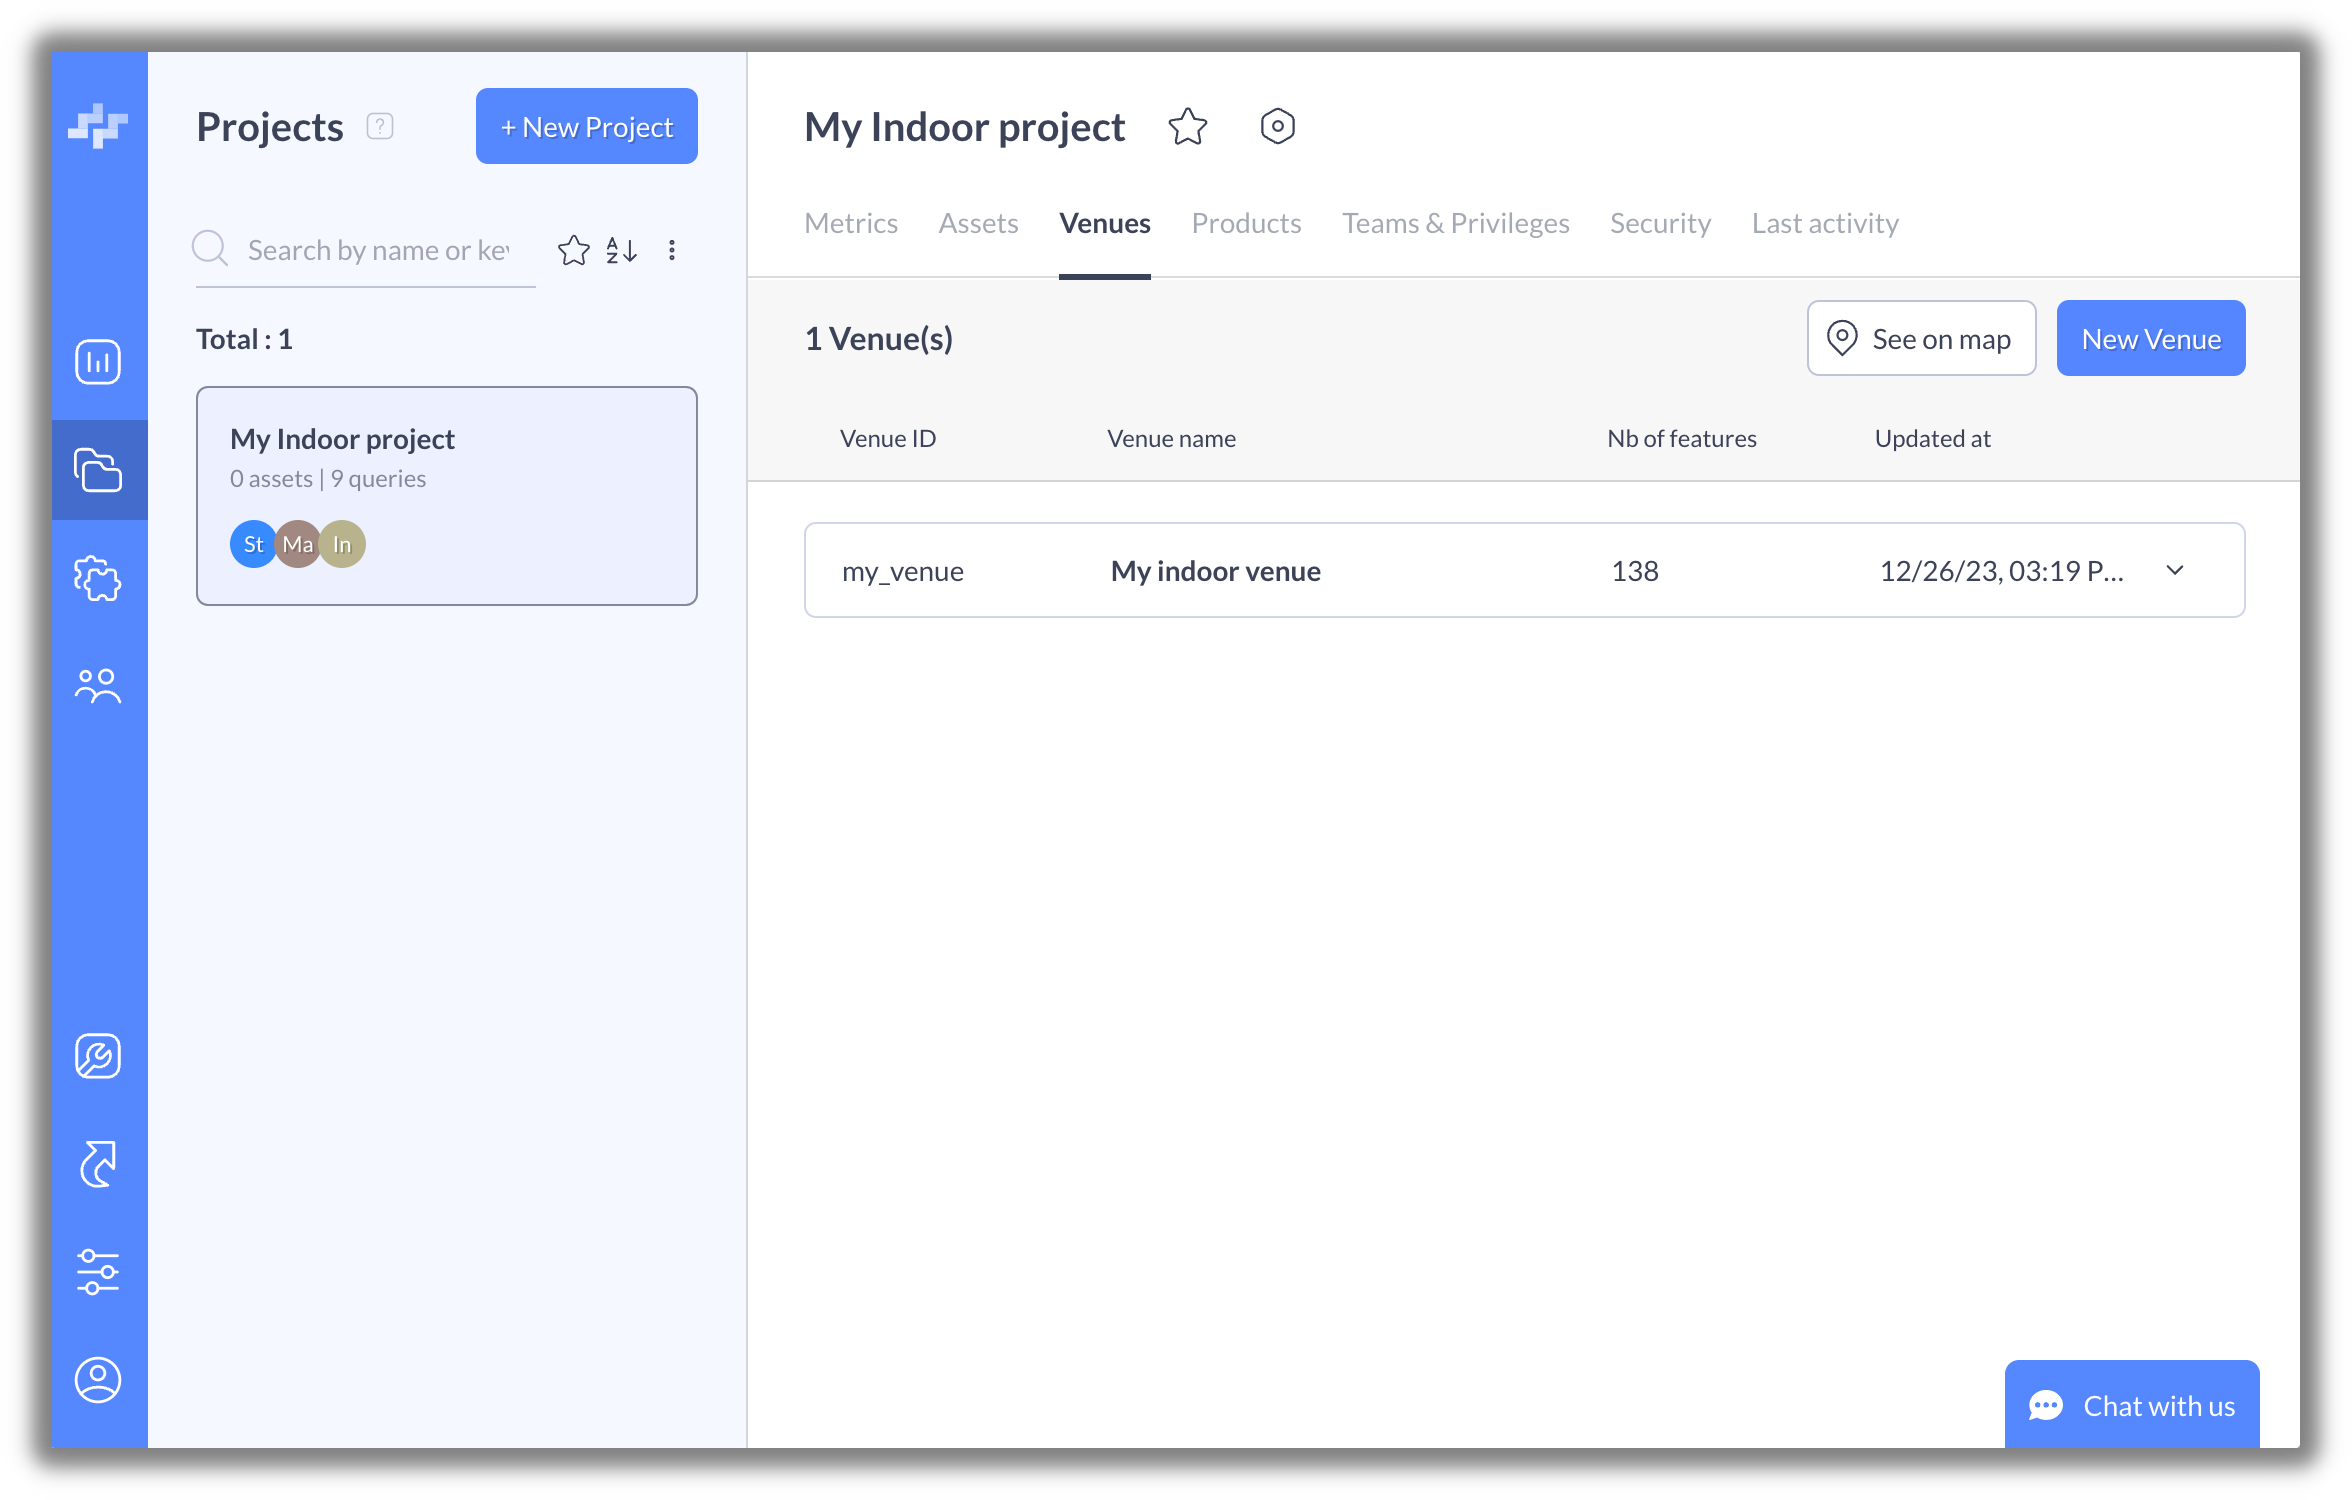
Step 2: Create New Venue
- Open the Venues tab
- Click “New Venue” button
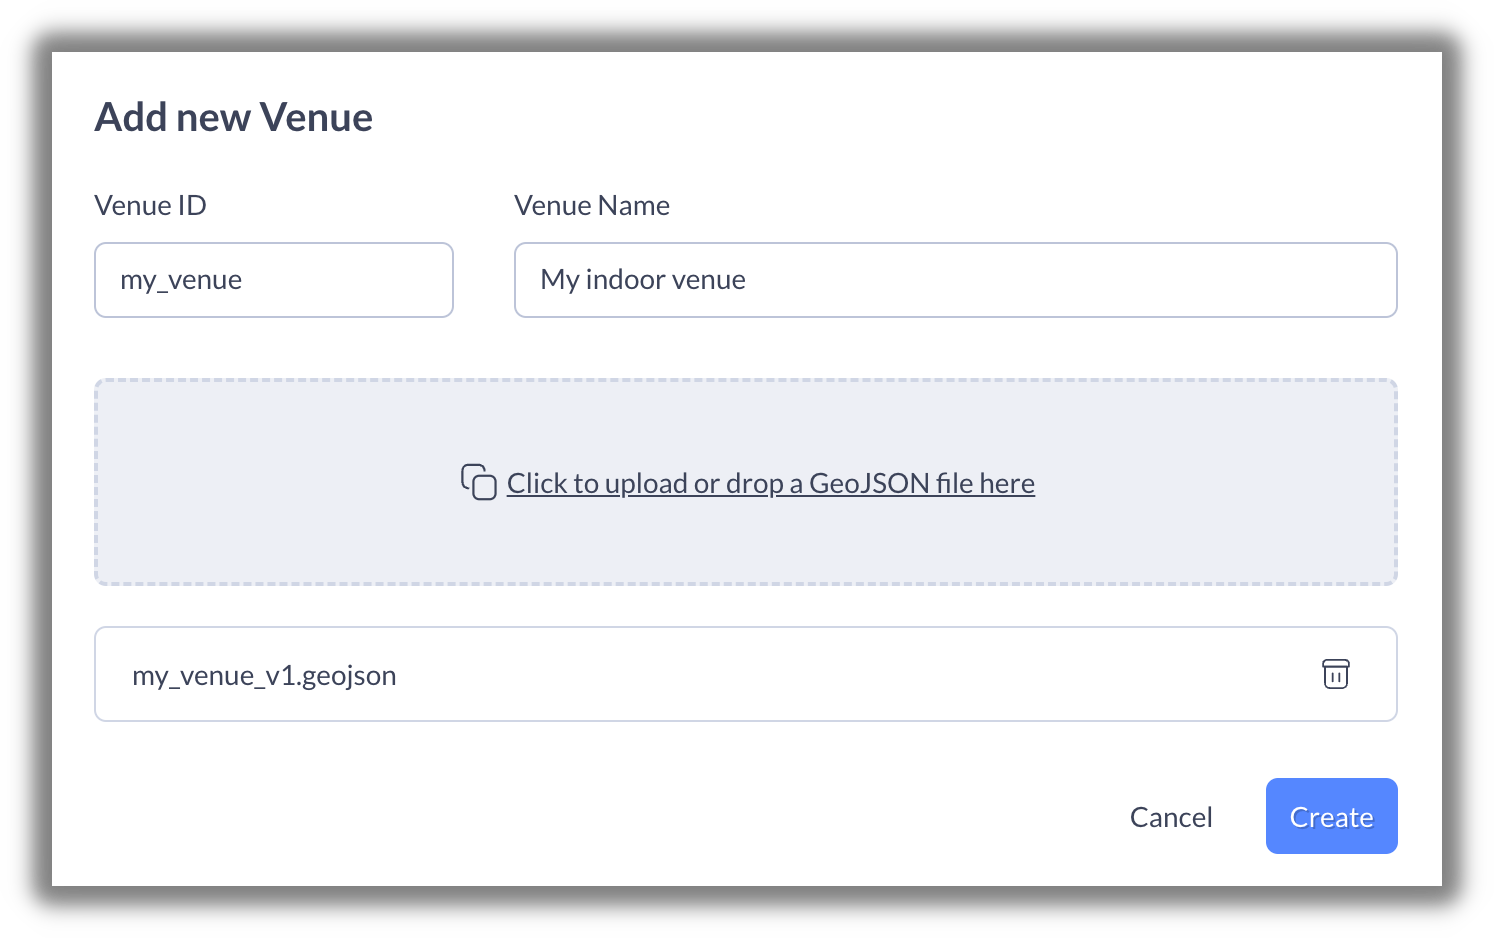
Step 3: Upload and Configure
- Define a unique Venue ID (e.g., “mall_downtown”)
- Set a Display Name for your venue
- Upload your GeoJSON file
- Click Create
Step 4: Finalize POI Data
After upload, use the Woosmap Console to:
- Review and edit POI information
- Set opening hours
- Add descriptions and images
- Configure contact information
- Assign categories and tags
- Set accessibility attributes
Validation Checklist
Before uploading, verify your GeoJSON:
- All features have
indoorproperty - All features have
levelproperty (integer) - All
refvalues are unique - POIs have
nameproperty - POIs have appropriate type (amenity/shop/room)
- Pathways use
highway=footway - Floor connectors have multi-level property
- Routing profiles are applied where needed
- Coordinates are in correct format [lng, lat]
- No closed pathway loops
- Pathways connect to POIs
Common Issues and Solutions
Issue: POIs not searchable
- Solution: Ensure
nameproperty is present
Issue: Navigation doesn’t work
- Solution: Check that pathways form a connected network and touch all POIs
Issue: Wheelchair routing fails
- Solution: Mark stairs/escalators appropriately and ensure elevator paths exist
Issue: POI doesn’t display with icon
- Solution: Verify correct amenity/shop/room property is set
Issue: Multi-floor navigation fails
- Solution: Ensure floor connectors have correct
levelproperty (e.g., “0;1”)
Integration Path
Step 1: Set Up Your Venue
- Follow the “Create Your Indoor Map” guide above to digitalize your space
- Upload GeoJSON to Woosmap Console
- Receive your unique Venue ID
- Configure POI data and categories
Step 2: Obtain API Credentials
- Register at Woosmap Console
- Create a new project
- Generate API keys (public and private)
- Configure allowed domains/apps
Step 3: Choose Integration Method
- Web Apps: Use Map JS API with IndoorRenderer
- Mobile Apps: Use iOS, Android, React Native, or Flutter SDKs
- Backend Services: Use REST API with private key
- Quick Prototyping: Use Indoor Widget
Step 4: Implement Core Features
- Display indoor map with IndoorRenderer
- Add POI search with Autocomplete
- Implement navigation with Directions service
- Optimize with Distance Matrix for nearest POI
Step 5: Enhance User Experience
- Add floor selectors
- Implement “You Are Here” markers
- Show route visualization
- Add landmarks in instructions
- Support accessibility features
Need Help?
Woosmap Digitization Service
Not ready to digitize your venue yourself? Woosmap offers a professional digitization service. Our team takes your existing floor plans and produces a fully configured GeoJSON file including POIs, routing graph, floor connectors, and routing profiles — ready to upload and go live.